Building in Delverium
Walls, doors, beds, light, and the hammer — the room checklist that separates a shelter from a cathedral.
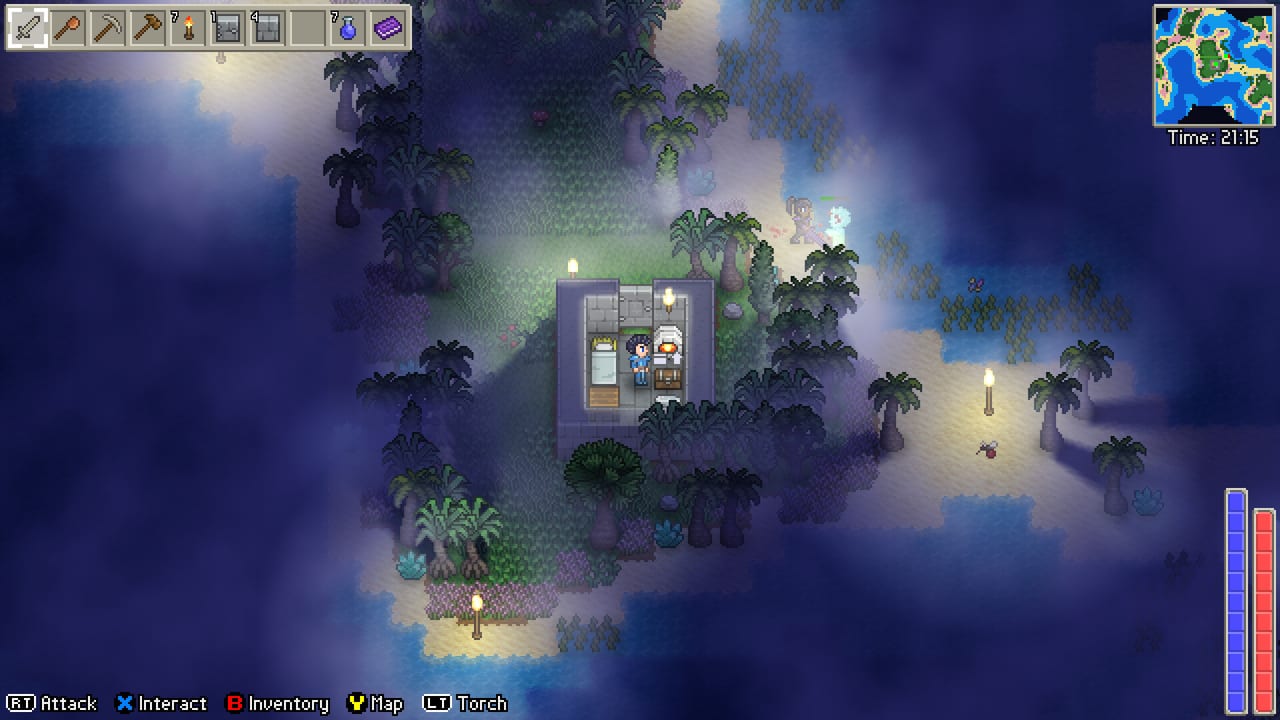
Delverium puts building at the centre of survival. You need a valid room before you can recruit a gatherer, a blacksmith, or a merchant. You need a closed door before a zombie stops walking through your bedroom at 2 a.m. Sagestone Games gives you wood, stone, and straw from the first swing of an axe, then expects you to turn those into walls, floors, furniture, and a base that can house NPCs, livestock, and a workshop before you push into the Faults. This guide covers the shelter checklist, the hammer placement system, flooring, base location, NPC room design, and the expansion from starter box to full settlement. It assumes you have opened the demo or the Early Access build and have a workbench nearby.\n\nEarly Access is scheduled for September 22, 2026. Building recipes you see in a February 2025 demo recording may shift. When a station name or material cost appears in both a preview and a player wiki, we treat it as current. When we have only one source, we say so.\n\n## The valid room checklist\n\nA Delverium shelter is not a vibe. It is a legal classification. The game checks four things before a room counts:\n\n- Enclosed walls — four walls forming a closed perimeter. A three-wall L-shape is not a room, even if it looks cozy in a screenshot.\n- A door — a craftable door placed in a wall gap. The game must be able to open and close it. A gap in the wall is not a door.\n- A bed — a craftable bed placed inside the enclosed area. The spawn point sets here; without a bed, you respawn at the world origin on death.\n- A light source — a placed torch, lantern, or chandelier. Windows do not count. Ambient cave light does not count. If the room is dark when you close the door, add a torch.\n\nPreview players reported that flooring is sometimes required for the game to validate a room. If you build walls, place a door and a bed, and the game still says the room is invalid, add floor tiles before adding more furniture.\n\nThis checklist is the same for every room in the game. Your first one-room shelter. A blacksmith forge room. An NPC bedroom. A livestock barn. All of them need the same four items. The difference is what you put inside after the checklist is satisfied.\n\n## Walls, doors, and the Hammer\n\nThe hammer is Delverium’s building multitool. You use it to:\n\n- Place build pieces — walls, floors, stairs, roofs, and furniture all go in with the hammer selected. The piece in your hand is a real object, not a ghost that resolves at a confirmation screen.\n- Rotate placed pieces — the rotate control (see the controls guide) changes the facing of walls, doors, and furniture before you place. A door that opens inward and a door that opens outward change pathing for enemies and NPCs.\n- Remove or reposition misplaced pieces — the hammer also dismantles. If you place a wall in the wrong corner, switch to the hammer, target the piece, and remove it. You get the materials back.\n\nDemo players who panicked at 2 a.m. when a zombie walked through an open doorway had usually placed the door facing the wrong way or had not closed the wall behind them with the hammer. Keep the hammer on the hotbar next to the pickaxe. They are not the same tool. Pickaxe mines ore and dungeon walls. Hammer places and removes buildings.\n\nWooden walls are the starter material. Stone walls appear once you have a furnace and early metal. Preview players noted that stone walls are slower to craft but more resistant to zombie knock. If you are building in a zombie-heavy biome, stone is worth the extra trip to the furnace. Straw and wood combinations are decorative in the demo but may have structural uses in later builds.\n\n## Flooring\n\nFloor tiles are a crafting station output, not a gathered material. You craft them from the build menu when you have the right inputs, then place them inside your walls with the hammer. Floor tiles serve three purposes:\n\n- Room validation — some biomes or room types require floor tiles before the game recognises a space as a valid room. If your first shelter keeps failing validation, add floor tiles before you add a second bed.\n- Decoration and biome matching — wood floors, stone floors, and path tiles each have a visual character. Preview players used path tiles to mark corridors between rooms.\n- Farming floor — the farming guide notes that tilled soil sits on world ground, not on floor tiles. Do not pave your crop rows unless you want to experiment with edge cases.\n\nFloors do not affect structural integrity in the demo, but they do affect NPC pathing. An NPC will not walk across an open floor tile gap any more than they will walk through a missing wall. Fill the floor before you fill the chests.\n\n## Base location strategy\n\nWhere you build your first shelter matters for the entire run. Preview players and wiki contributors agree on a few principles:\n\n- Flat ground beats a scenic hill. A flat site means fewer foundation tiles, easier room expansion, and fewer gaps for enemies to path through at night.\n- Near water, not in it. A water tile next to your base means an infinite watering source for farming without carrying a trough. A water tile inside your walls means you cannot place a floor there.\n- Away from large trees and ore deposits you cannot move. Building next to a world tree means rebuilding when the tree drops. Building on top of an ore vein means choosing between the ore and the wall. Demo world generation is procedural; scout a few tiles before you commit.\n- Central enough to walk to a Journey shrine. The shrines guide covers fast travel. If your base is on the far edge of the map from the first shrine you found, the first deep dungeon run becomes a very long walk back to water the farm.\n\nThe first shelter does not need to be the permanent base. Preview players noted that abandoning a starter shelter to rebuild on a better site is common. Do not wait for a perfect site before you build. Get the four-item checklist done, set your spawn, and survive the first night. You can relocate when the workbench and furnace are in place and you have a sense of the local biome.\n\n## NPC room layouts\n\nNPCs move in through recruitment, not through a shop menu. Each NPC needs their own valid room: walls, door, bed, light. One NPC per room. You cannot stack two merchants in one bedroom. You cannot put a blacksmith and a gatherer in the same forge room unless the forge is large enough to count as two rooms by the game’s definition.\n\nPractical layout for a recruit’s first room:\n\n1. Four walls enclosing a minimum of about nine floor tiles (a 3×3 interior). More space is better for furniture but costs more materials.\n2. A door in one wall. Face it toward your main base so the NPC path back is short.\n3. A bed against the back wall.\n4. A torch or lantern near the bed.\n5. A chest for the NPC’s inventory if the role needs storage (the merchant and gatherer both accumulate stock).\n6. Role-specific furniture once you have the recipe: a workbench for the blacksmith, a cook pot for the agronomist if you want them to use one, a chest for the merchant.\n\nNPCs do not need a window. They do not need decoration beyond the four-item checklist. They do need a light source that stays lit. If a torch burns out in the demo, replace it before the NPC walks into a dark room and triggers a bat spawn. We will update this page when Early Access confirms torch durability.\n\n## Expanding to a full base\n\nOnce your first shelter is valid and you have a workbench, furnace, and perhaps a small farm, the expansion begins. The practical sequence:\n\n1. Storage room — one large room with chests, not scattered boxes. A centralised storage room near the entrance means you stop losing pickaxe heads in a field. Label chests by contents if the UI allows.\n2. Workshop — workbench, furnace, and stone anvil in one connected room. You want to be able to nest-craft from ore to bar to tool without sprinting across the base.\n3. NPC row — a corridor of small identical rooms, each with walls, door, bed, torch, and one role-specific piece. Build this when you have the materials to finish a room in one session. An unfinished NPC room is not a recruiting tool.\n4. Farm and livestock — the farming guide covers pen rules (fence, gate, trough). Place the pen where you can see it from the door of the main house. An escapee chicken during a goblin raid is funny the first time.\n5. Defensive layer — outer walls, spike traps if recipes exist, and lighting around the perimeter. Night enemies path toward light and open doors. A well-lit base with closed doors stops most wandering spawns.\n\nThe embedded video on this page is a building-focused look at Delverium’s base construction. Watch the layout, not the specific recipe names. The discipline to steal: build the checklist first, then decorate. A crooked three-room house with a furnace, a torch, and a closed door will outplay a cathedral with no anvil and no bed.\n\nFor a player who wants to build first and delve second, the loop is: getting started checklist → workbench and furnace from crafting → small farm from farming → NPC rooms → full base. For the map of other pages, return to the guides hub. For the honest Early Access caveat, read the review before you plan your cathedral.
Frequently Asked Questions
Quick answers to the most common Delverium questions.
Does any four-wall box count as a valid shelter in Delverium?
No. A valid shelter needs walls, a door, a bed, and a placed light source. A box of walls with no door and no torch is not a shelter by the game's rules and will not set your spawn point.
Can two NPCs share one bedroom?
No. One NPC per valid room. The room rule is consistent: walls, door, bed, light. If you want a blacksmith and a gatherer, build two separate rooms.
Do windows count as a light source for NPC rooms?
No. Windows do not count in the demo. You need a placed torch, lantern, or chandelier. Ambient light from outside does not satisfy the room validation check.
How do I rotate a door or wall after placing it?
Use the hammer with the rotate control while the piece is in your hand, before you place it. If it is already placed, remove it with the hammer and re-place with the correct rotation.
Should I build on top of an ore deposit?
Probably not. Building on top of an ore vein means you must choose between the ore and the wall. Scout your site before you commit the first four walls. Relocating a starter shelter is common and cheaper than mining through your own foundation.
What is the correct order to expand a base?
Practical sequence: valid starter shelter → storage room with chests → workshop with workbench and furnace → NPC row (one room per NPC) → farm and livestock pen → outer defensive walls. See the expansion section above for details on each step.
Can I pave farmland with floor tiles?
The farming guide notes that tilled soil sits on world ground. Floor tiles are not required on farm rows and may interfere with soil placement depending on your build version. Test before you pave.